VALENTINE’S DAY DIY: Bucket list Book

It is the time again to show your loved one that you care. The day of love, as many know it as Valentine’s Day is coming up in a couple of days. Alongside Valentine’s Day is a far less celebrated day in the United States: day of friendships. This holiday, dia de la amistad, is popularly celebrated in Latin America and in Latino communities in the US.

Both holidays celebrate love, and what perfect way to celebrate your loved ones by creating a  perfect easy DIY. It is so easy that in the end, you will want to celebrate occasions just to make an excuse to do this DIY multiple times.
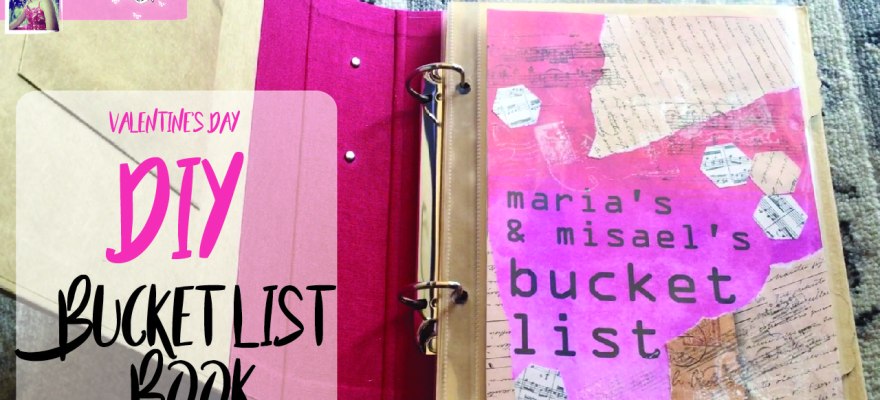
DIY Bucketlist Book 

You will need:

  • A small 3 ring small Binder*
  • Project Life Page Protectors (I used 6×8″ size)
    • You can find these at (Michael’s***, Joann’s*** and Amazon)
  • Project Life Cards**
    • You can find these at (Michael’s***, Joann’s*** and Amazon)
  • Cardstock
  • Various of decorative paper
  • Bucketlist

Optional Recommend Items:

  • Stickers
  • Washi tape
  • Ticket Stubs or Memorabilia
  • Becky Higgins Round Corner
  • Permanent Glue Runner
  • Decorative Scissors
  • Felt Color Pens

Items Mentioned:

I hope you enjoy this DIY gift and comment below if you have a bucket list and one thing on your bucket list. I need more ideas to add to my bucket list.

Till the next time, stay curious and you will discover a world beyond yours.

Maria


Disclaimer: I (Maria Renteria) am a participant in the Amazon Services LLC Associates Program, an affiliate advertising program designed to provide a means for sites to earn advertising fees by advertising and linking to Amazon.com
However, not all links are associated with Amazon Associates Program. I chose to use the link with the best cheap price of the items. I often buy my items in clearance are hard to come by. When this is the case, I use the Amazon link. You can choose to use my links or google the item.

* In my video I stated that it was a Smash Book. Unfortunately, I mess up the details of the binder. It is a Simple Stories Snap Binder, 4 by 6″, Red. However, Smashbooks are similar and I recommend it K&Company 30-685949 SMASH Kraft Paper Cover with Black Binder. I also recommend Project Life Small 3-ring binder or the Target binders at the dollar spot.
** I collected different ones. I highly recommend the smaller packets of Project Life cards like this one Project Life Themed Card, Travel because you will have multiples of the same one and this theme is common in the bucket list. If you like your bucket list to have a theme than the ultimate packs are the best, but they usually cost $29.99.
*** Tip: Do not forget to use your coupons. You can use your Joann’s coupon at Michael and vice verse. If you shop online, earn money on your purchases at these stores online by using Ebates, where you can get a percentage back in cash.

DIY: Daily Life Journal

Are you going through a rough patch in your life? Do you suffer from episodic depression? Are you yearning for those happy days, but are only having sad grumpy days?

Well, I did and still going through with it. I was facing many stress after I finished college. It seems to me with each day passing my life was getting more out of control. I was in a real slump that I would not come out of room, watched marathons of tv shows, and would not like to hang out with the family or friends.

Daily task became so hard when you are in a depression. Each day I didn’t want to do my daily tasks or anything that will excite me like my hobbies.

A friend then told me that I need to take it just one day at the time. Thinking about this, then I thought what makes me stress and how can I take my life back.

I have not yet figure out everything, but with this simple DIY Daily Life Journal helps me found the positively of everyday and helps me take a day at a time.


Materials you need:

  • A journal or notepad
  • Page flags
  • Multiple color pens
  • adhesive
  • optional: stickers or paper with quotes


  1. First divide your journal into three sections. One section is going to be half the size of the other sections. You can add more sections if you like. I kept it at three because it seems less of daunting task.
  2. Place page flags where each section begins. You can label the section on the flag if you want.
  3. Recommend topics for sections:
    • Inspiring Quote of the Day- I look for awesome inspiring quotes from public figures to literature because it makes me feel that someone has gone through a struggle and give us the wisdom he or she have gained from it. I also look back at this section whenever I feel that I am starting this episodic period of my life.
    • Inspiring Playlist- Music definitely speaks to my soul. Whenever I am in this slump, I usually look to music to get more sad. However, to override this action, I created a playlist to bring my spirits up. It also helps if you can create this playlist in your Spotify.
    • Find of the Day – I look for the most positive things that happen to me that day.  These usually are events, hobbies, or task. When I look back at this section, it makes me realize the positively and reminds me of the task that I really do enjoy.
    • Three Goals of the Day- To get life going, I made this task list to complete simple everyday chores. Every time I cross a task off, I feel proud and get happier. When I do not complete a task, I write a note of encouragement that I will complete this task next time.

Tips

  1. You don’t have to write in this every day. Your ultimate goal is to write less and less in the journal.  I usually write in it when I am sad. When I am happy, I try to enjoy the moments and don’t worry about writing. 
  2. Do it in your style. You know what works for you. What works for me doesn’t mean it will work for you.
  3. Keep it simple. The more it is minimalist the less likely you are to stress out. Usually I give up writing because I don’t have the color, stickers or the right stationary. Keep it simple, no more than three colors. I usually print out photos of quotes on sticker paper to keep in my journal when I don’t have quotes in mind.

Hope you enjoy this small diy. I hope that this journal brings some light like it does to me. If you do do Daily Life Journal, hashtag #yayaiammaria so I can see you setup and I can support you with a like in this time of yours.

Till the next time, stay curious and you will discover a world beyond yours.

Maria

Unique Gifts for Geeks

Christmas is fast approaching with only 10 days left. Yet, it is not an excuse to have unique gifts for that special geek or geeks in your life.

I totally geek out about stuff, so you can trust me in these unique gifts for the ultimate geek.

Geeks like many things, but unfortunate this blog post won’t be able to cover all things geek relating. So I chose five things that for sure a geek will love.

Comic Books

  
 The older the comic book, the more it shines to your geek. Comic books are the definitely home run since they cover many topics, superheroes, cartoon characters, history, sci-fi,  illustrations and etc. You can find comic books everywhere. But the older or rarer are only found in comic book stores or thrift shops. If you live in Los Angeles, check your nearest Salvation Army. I found boxes of boxes of vintage comic books.

Vintage Toys/ Collectibles

These are the things that make a geek collection important. Again, the rarer or vintage it is the happier your geek will be.

  • Things that you should look for:

    • Dolls and Accessories– Many people overlook the importance of accessories. I always can find accessories to barbies, GI Joes, or other dolls. The person who collects these probably has the dolls, so he or she will love the accessories
    • Posters– You will find many of these framed so look thought the home section.
    • Toys This is what I look for the most. Usually I look through my local thrift stores, yard sales and flea markets. Check out the Goodwill Online Shop.
    • Stuff Animals/ Plushies  Tip- go to a specialty store that sells that character and ask for tips on how to care for it, sometimes washing or dry cleaning damages it.  Sometimes the stuff animals have instructions labels.

Books

Your fellow geek will like to get more information of the topic that he or she geeks about. So why not turn to a book for this information

  • Things that you should keep an eye out: 
    • Memoirs
    • History Books
    • Behind-the-Scenes
    • Fiction Books— I find Harry Potter, Hunger Games, Star Wars and other books at my local Goodwill outlet and it cost 25 cents each.

Re-purpose Thrift Finds

Sometimes you find that one book or board game that is missing a piece, ripe or in bad condition. You can always re-purpose your finds and create a unique one of piece honoring the geeking subject.


Geek Theme Vintage Clothing

This is my favorite part finding vintage clothing that is related to my geek obsession.

  • Things that you should look for:
    • T-shirts- These are best to find with the subject your geek loves
    • Try to clothes similar to the cartoon, show or character that your geek loves. You have more luck in finding something in the thrift store or flea market of something if the character is from another decade.
    • You can always use a form of a clothing into a cosplay costume.  

I found these at a thrift store in Santa Cruz. Planning to use these as regular pins


Hope you enjoy these ideas for unique gifts. If you do decide to give one of these unique gifts, #yayaiammaria or tag me Instagram or Facebook.

Till the next time, stay curious and you will discover a world beyond yours.

Maria

This is Halloween DIY: Mermaid Crown & Mermaid Bra

It is that time of year, my favorite time of year, Halloween! I love this day of the year because it combines two of my favorite things: DIYs + Dressing Up. Since I love Halloween so much, I will feature three posts, this being the first of the series.

This is Halloween, everybody makes a scene, everyone makes a DIY. 

Mermaid Crown DIY

Materials:

Supplies needed for the Crown

Supplies needed for the Crown

  • 1 Plastic Crown (I got my at 99 cents store)
  • Multiple Silver Pipe Cleaners
  • Various Types of Seashells
  • Hot Glue Gun
  • Hot Glue
  • Multiple Flatback Pearls

Instructions:

1.  Remove extra accessories from the crown. I had to remove feathers.

2.  Start covering the crown with the silver pipe cleaners. I recommend starting from the bottom and tightly wrapping it.

Wrapping the Crown with the silver pipe cleaners

Wrapping the Crown with the silver pipe cleaners

3.  Arrange the seashells the way you like it. I had the big shells in the crown to give it a center balance.

4.  Hot glue the shells.

Gluing the seashells to the crown

Gluing the seashells to the crown

4.  Hot glue the flat-back pearls where the mini gaps are between the shells.

There you have it, an undersea princess crown for any mermaid.

Viola, a finished mermaid crown

Viola, a finished mermaid crown

Mermaid Seashell Bra DIY

Materials:

  • 1 Old Bra
  • Rose Gold or any Acrylic Paint that looks like sand
  • Various Types of Seashells
  • Hot Glue Gun
  • Hot Glue
  • Multiple Flatback Pearls
  • 2 string of pearls
  • White sewing thread
  • sewing needle

Instructions:

  1. Paint the bra with the rose gold acrylic paint. I use a strapless bra, but you can have straps and decorate them too.
  2. Arrange the seashells the way you like it.
  3. Sew one strung pearl set from the center of the bottom of the bra.
  4. Sew the other half where it ends. Mine finished at the other side of the bra cup.
  5. Repeat step 3 and step 4 for the other strung pearl set.
  6. Hot glue the shells.
  7. Hot glue the flat-back pearls at the edge of the bra to outline the bra.
  8. Hot glue the flat-back pearls where the mini gaps are between the shells.

Viola, a mermaid inspired top for your Halloween outfit.

A look at the bra

A look at the bra

Completing the look

I completed my mermaid look with a seaweed green mesh long-sleeve and an emerald green mini shirt with a long sheer emerald skirt over.

I use gray, white, pearl, silver and every shade of green eye shadow to create a Peter Pan mermaid face. I use nail glue to glue various sizes of clear, teal, and pearl sequins.

A mermaid crown paired with a mermaid bra on top of a sea foam green mesh top.

A mermaid crown paired with a mermaid bra on top of a sea foam green mesh top.

Now, I am off to the deep blue sea.

Till the next time, stay curious and you will discover a world beyond yours.

Maria

Top off your 1920s look with a DIY 1920s Headband

I love to get invited or throw theme parties because the best part of those types of parties is getting dressed up. But, it can get costly if you want to get “dress to the t.” However, it does not have to be expensive if you do some DIY accessories to help you get the authentic “look” for that theme. For my 25th birthday, I threw a roaring 1920s party. I keep the cost down with this 1920s DIY Headband. Hope you enjoy my DIY and let me know in the comments below if you want another theme party DIY or any costumes.

DIY 1920s Headband

Supplies:

Fabric Measuring

Tape

Glue Gun

Glue Sticks

E 6000 adhesive

Satin Ribbon Decorative Ribbon (Bling out the better)

Your choice of strung bead metal sliders

Your choice of Feathers Felt square

Steps

  1. Measure your head with a fabric measuring tape. I placed the fabric measuring tape in the middle of my forehead and wrap around since the headbands in the 1920s were usually wore that way. Write down the measurement.
  2. Measure the satin ribbon to the same size and cut.
  3. Fold the satin ribbon and cut where the fold is.
  4. Now measure at the middle of your forehead from ear.
  5. Use these measurements for the bling ribbon and cut. Do it twice.
  6. Put E6000 adhesive on the bling ribbon.
  7. Place the bling ribbon on top of the on satin ribbon. Align it to the straight edge. Gently press to make sure all the ribbon is attached.
  8. Do the same for the other piece of bling ribbon and satin. Let dry Using the glue gun, place hot glue on the back of one slider and place it on the end of the ribbon.
  9. Do the same to the other side of the strung sliders.
  10. Let it dry.
  11. Get a couple of feathers, arrange to your liking.
  12. Hot Glue the bottom edges of the feathers.
  13. Cut a small rectangle piece from the felt square. Enough to cover the bottom of the feathers, but not bigger than your ribbon.
  14. Put hot glue around your feather bunch. Wrap the felt rectangle around.
  15. Let it cool down.
  16. Wrap the headband around your head, and place the feather bunch in the desired location.
  17. Place some hot glue on the back of the satin ribbon to place the feather bunch. Let it cool down Place your headband around your head, and tie the edges of the ribbon in a nice bow. Cut any excess ribbon not needed. I cut at the angle to make it fancy.

Whoa! A 1920’s inspired headband to top of your outfit.

The finished DIY 1920s Headband on top of a black hat.

The finished DIY 1920s Headband on top of a black hat.

P.S. Store it a box with tissue to keep it in great condition. It is also makes for a great gift for the 1920s fan. Just place it in a cute box.

This is how I store my headband. It contains a see through lid for easy view. I store the container in a low lit area.

This is how I store my headband. It contains a see through lid for easy view. I store the container in a low lit area.


This post was originally posted on my Ebay guides. However, all content is original and copyright by me, Maria Esmeralda Renteria. Small alternations such as introduction paragraph and typeface were changed to read smoother than the original ebay post. For the original post, please visit my Ebay Guides. Thank you.